Smart Home Helper
User Documentation for Smart Home Helper
Please download the documentation for the Smart Home Helper from the links below
- Smart Home Helper User Documentation (Microsoft Word format)
- Smart Home Helper User Documentation (PDF format)
- Smart Home Helper User Documentation (EPUB format)
- Smart Home Helper User Documentation (HTML format)
Table of Contents
2.0 Statistics: Voice-Controlled Smart Home Devices
3.0 Statistics Regarding Individuals who are Nonverbal
6.0 Smart Home Helper Android Application Languages
1.0 About Smart Home Helper (SHH)
Smart Home Helper (SHH) is a no-cost-to-user Android app that enables individuals who are nonverbal and individuals with speech disorders such as stuttering, apraxia, and dysarthria to issue verbal commands to voice-activated smart home devices using Android’s Text-to-Speech synthesizer. SHH enables its users to issue smart home commands, in any one of 63 languages/dialects. Smart home voice commands can easily be created, organized, and shared with other users via SHH.
SHH was developed by IDEAL Group under a grant from the National Institute on Disability, Independent Living, and Rehabilitation Research (NIDILRR). NIDILRR is a Center within the Administration for Community Living (ACL), Department of Health and Human Services (HHS). SHH was developed to help level the smart home usability playing field for everyone.
2.0 Statistics: Voice-Controlled Smart Home Devices
In the U.S., home-based, voice-controlled devices include Apple’s Siri, Amazon’s Alexa, Microsoft’s Cortana, Samsung’s Bixby and the Google Assistant.
According to 6best.net, in 2021:
- Over 60 million people in the U.S. own 157 million smart speakers.
- At least one voice-activated smart speaker is owned by 53 million Americans.
- According to the Digital Market Outlook:
- The number of smart homes worldwide is expected to be 478 million in 2025.
- The total number of smart home device shipments worldwide is expected to be 1.77 billion in 2025.
3.0 Statistics Regarding Individuals who are Nonverbal
According to the National Institutes of Health, more than 70 million people worldwide stutter (about 1% of the population). In the United States, this represents over 3 million people.
According to the Centers for Disease Control and Prevention (CDC), and Autism Speaks, an estimated 30,000,000 people with autism worldwide are nonverbal.
According to the Cleveland Clinic, dysarthria is a speech disorder that happens because of muscle weakness. Motor speech disorders like dysarthria result from damage to the nervous system. Researchers don’t know exactly how common dysarthria is. It is more common in people who have certain neurological conditions, such as:
- Amyotrophic Lateral Sclerosis (ALS): Up to 30% of people with ALS (Lou Gehrig’s disease) have dysarthria.
- Multiple Sclerosis (MS): Around 25% to 50% of people with MS get dysarthria at some point.
- Parkinson’s Disease: Dysarthria affects 70% to 100% of people with Parkinson’s disease.
- Stroke: About 8% to 60% of people with stroke have dysarthria.
- Traumatic Brain Injury (TBI): Some 10% to 65% of people with traumatic brain injury have dysarthria.
4.0 Installing SHH
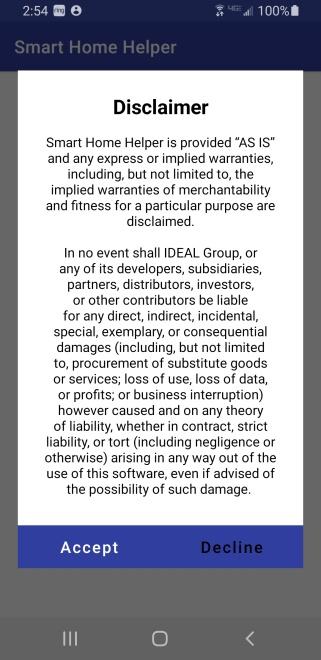
4.1 Liability Disclaimer Screen
When the Smart Home Helper app is launched for the first time, you are presented with a liability disclaimer screen. You must accept the liability disclaimer by pressing the Accept button to continue. When accepting the liability disclaimer, it is important that you have an active internet connection. Here’s a screenshot:
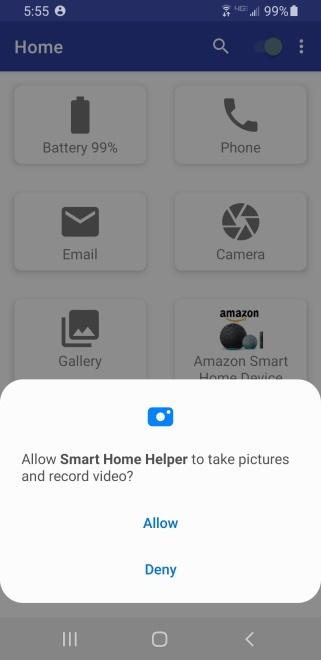
4.2 Android Permissions
SHH requires that you grant it permission to use your device’s camera. The camera is needed in order to take a picture of a QR Code to create new buttons sent to you from other users. In order to grant the camera permission, you need to permit SHH to take photos and record videos.
About Android Permissions
As the name suggests, app permissions govern what your app is allowed to do and access. This ranges from access to data stored on your phone, like contacts and media files, through to pieces of hardware like your handset’s camera or microphone. Granting permission allows the app to use the feature. Denying access prevents it from doing so.
Applications cannot automatically grant themselves permissions, they have to be confirmed by the user. Apps will ask you to accept each of their permissions the first time you launch them via a popup that asks you to “allow” or “deny” each request.
Well maintained modern apps will continue to function even if you deny its permissions, although some features obviously won’t work. Often if you try to use a feature requiring a previously denied permission, you’ll see the permission popup appear again. There’s often no problems with denying app permissions you feel uncomfortable with, they always be changed later.
5.0 Using SHH
5.1 Default Buttons
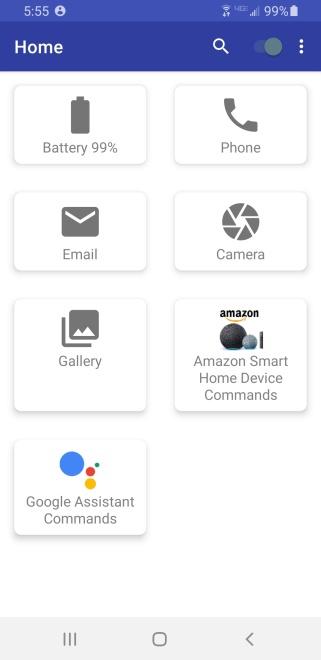
When you accept the Liability disclaimer, you are taken to the home screen. The home screen has the following default five buttons. These buttons cannot be edited, deleted or shared as they are always available by default:
- Battery: Speaks out the current battery value of the device
- Phone: Launches the default phone dialer on the device
- Email: Launches the default email handler on the device
- Camera: Launches the camera on the device
- Gallery: Launches the default photo gallery app on the device
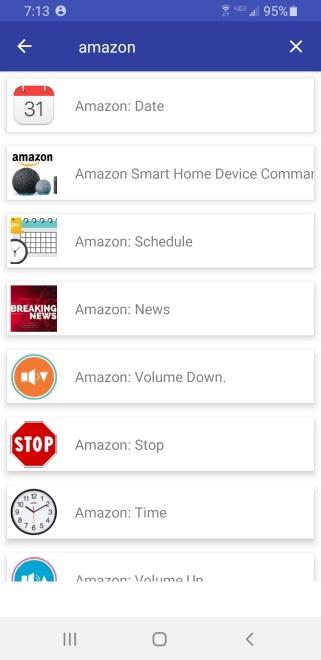
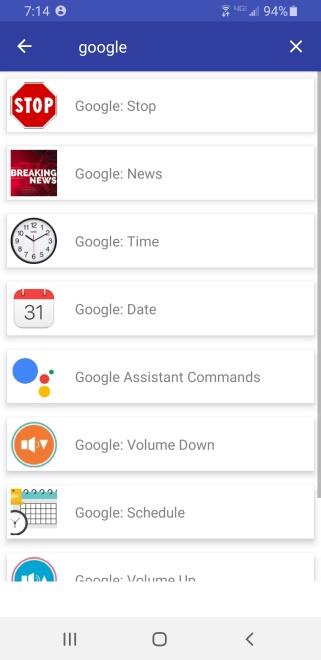
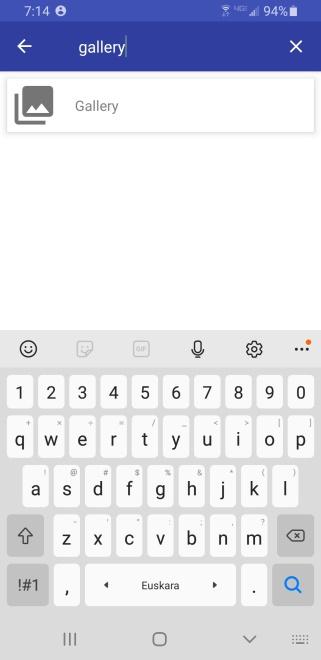
5.2 Search Button
On the top of the application in the title bar, there is a search icon. This allows you to search for a button, with specific text, in the list of buttons. This is helpful when the number of buttons increase and it is difficult to locate action buttons. Note that the search button only searches buttons in the category of buttons currently being displayed. Here are a few screenshots of the results of searching for several key words:

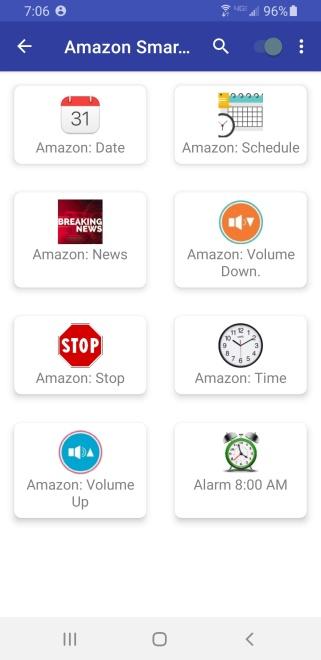
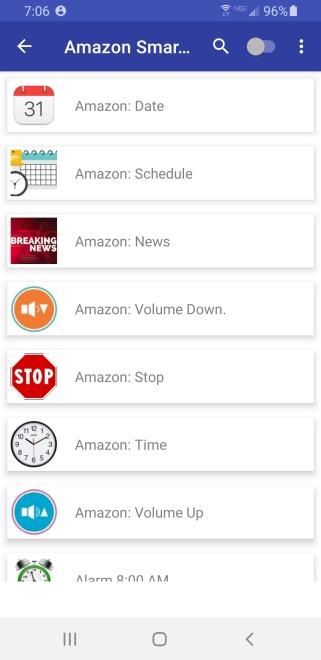
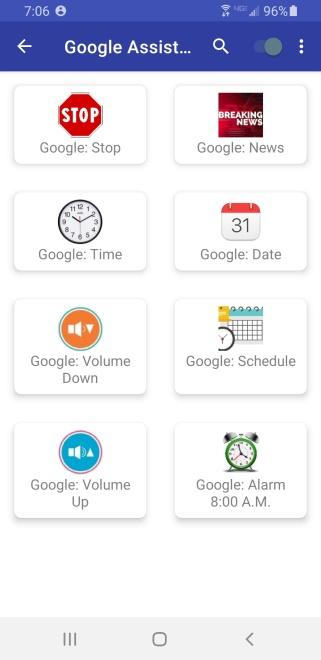
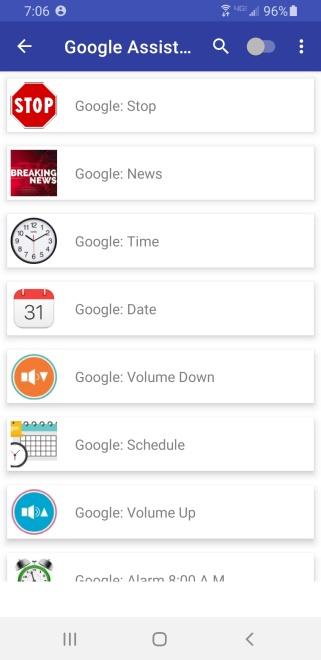
5.3 Switching Layouts
On the top of the application, in the title bar, there is a toggle switch. The toggle switch changes the layout of the actions buttons from Grid View to List View and back. Immediately below are a few screenshots.
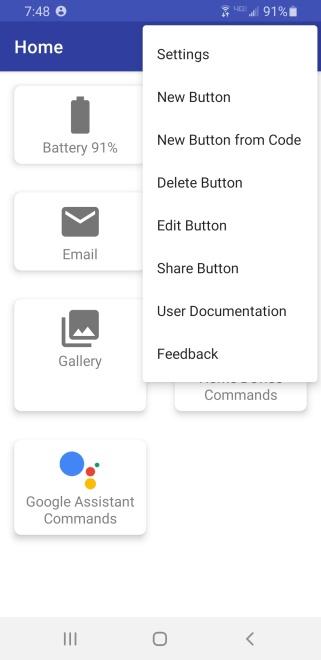
5.4 Menu Options
- In the title bar of the application there are three small vertical dots. It launches the Menu Options for SHH.
- The detailed functionality of each of the Menu Option is as follows:
First, here’s a screenshot of the Menu Selections:
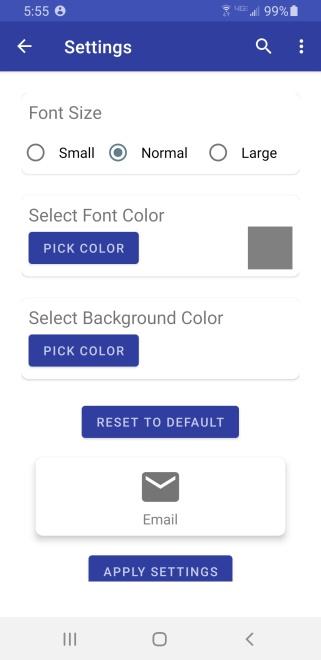
5.4.1 Settings Menu Selection
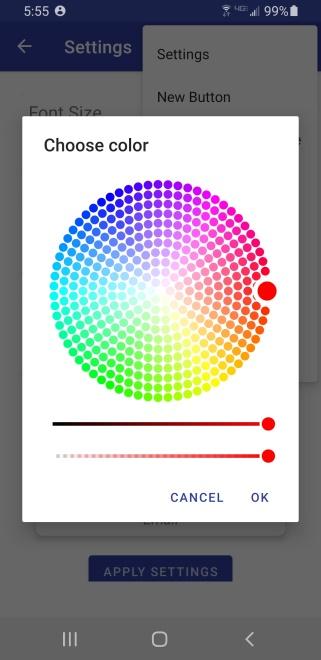
The settings selection allows you to configure how the action command buttons appear. You can change the overall settings for buttons as follows:
- Text: Select between Small, Normal and Large text displayed for the actions buttons.
- Font Color: Select the Color for the text of the buttons in the app.
- Background Color: Select the background color of the buttons displayed by SHH.
- Preview:Visualize the settings by looking at the “Email” button example. As you change the font size, font color and the background color the appearance of the action buttons on the app will all take on those characteristics.
- Apply Settings: When you are satisfied with the selection of the font size, font color and background color, you should press “Apply Settings” to apply the selected combination.
- Reset to default settings: Should you desire to change back the font size, color and background color to the initial settings, you can press the “Reset to default” button. This will reset the font size, font color and the background color of the buttons to the initial settings.
Here are screenshots of the Settings selections:
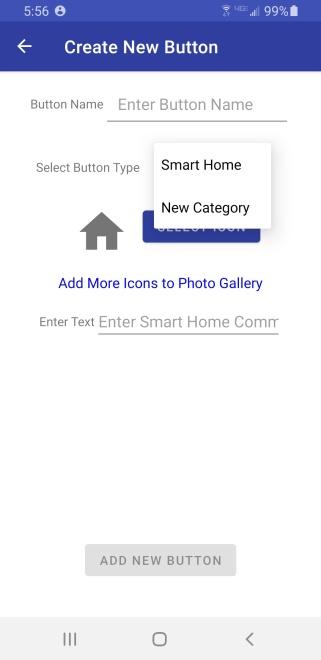
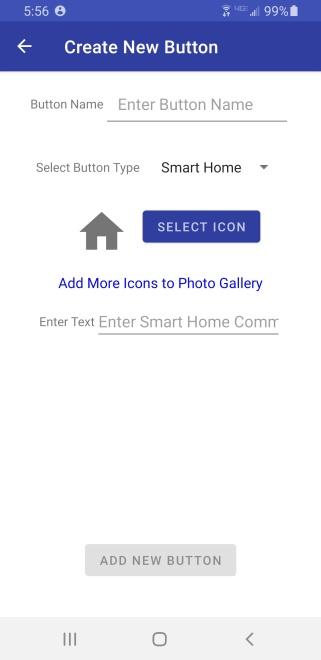
5.4.2 New Button Menu Selection
When selected from the menu, you are presented with screen to allow adding a new text-to-speech command button. The following information and attributes of the button can be set:
Button Name
Type an easily identifiable name.
Select Button Type
Select one of the two options below
- Smart Home: Type in the requested “Smart Home” command information and save it. These commands are spoken out using text to speech to control the home automation device.
- New Category: If you want to create multiple buttons having something in common you should group these buttons together, under a category. You first need to create a category button. Category buttons cannot be shared. Only “Smart Home” buttons can be shared. When this option is selected you can type in the name of the “New category.” This will help you organize buttons into different categories for easier access. Note:Category buttons are created at the same level from where you create the button.
Creating a Smart Home Command Button
Button Name: Enter a button name that described the command this button will be issuing using text-to-speech
Select Icon: Press the “Select Icon” to select the icon for the button. You are then shown the default image gallery application from which to select an image/icon. There is also a link “Add More Icons to Photo Gallery” for you to access external resources where there are more icons.
Enter Text: Type in the command that is read aloud using text-to-speech. Here are a few examples:
- Alexa. Lower the Volume.
- Alexa. Set alarm for 8:00 PM.
- Hey Google. What is my schedule for today?
- Hey Google. What time is it?
Creating a Smart Home Category Button
Button Name: Enter a category name that described the command this button will be issuing using text-to-speech
Select Icon: Press the “Select Icon” to select the icon for the button. You are then shown the default image gallery application from which to select an image/icon. There is also a link “Add More Icons to Photo Gallery” for you to access external resources where there are more icons.
Create New Button: Select this last. Note: Your category button will be inserted at the lever you were at when the button was created.
5.4.3 New Button from Code Menu Selection
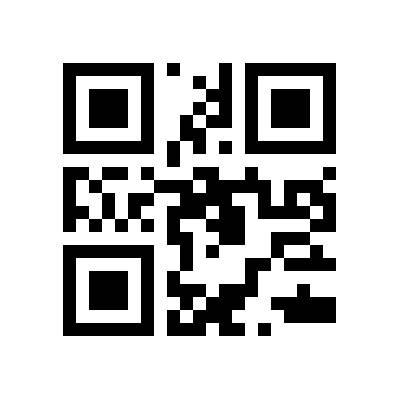
Enter the button code you received from someone. Or, you can launch the QR code scanner to scan the QR code of the new button to be added.
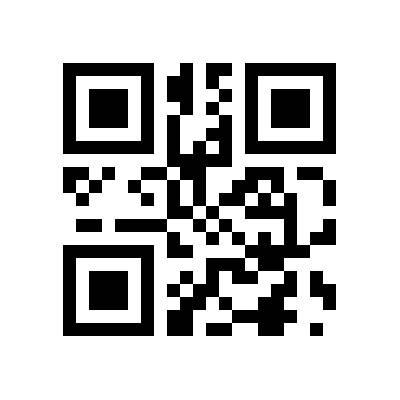
If you have already added the button with the given code from the text or QR code, you are presented with the error message, “The button with the given code already exists”. This prevents you from creating the same buttons over and over again. Here are a few examples or QR codes that have been shared. Try scanning them. Important: It is important that buttons of similar nature be organized into categories. It is only from within a Category that a button should be added. Click on an empty category to take you to the place to add a button within that category. Here’s a series of screenshots highlighting the process. Also, here are some examples to experiment with:
Button Name: Amazon: Date
Button Code: 38suyo9gx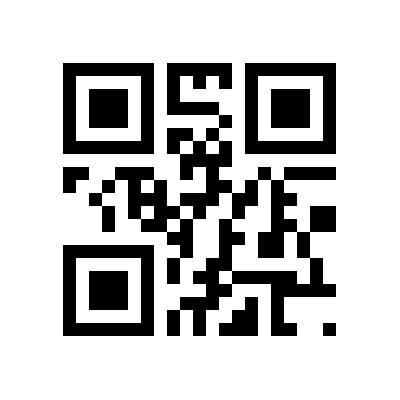
Button Name: Amazon: News
Button Code: 3wpv4rjzf
Next, click on Google Assistant Commands. From within that blank category, add the two following buttons either by entering the code number or using the accompanying QR Code:
Button Name: Google: Time
Button Code: 41bgxnmc7
Button Name: Google: Date
Button Code: 2v6thgm6i
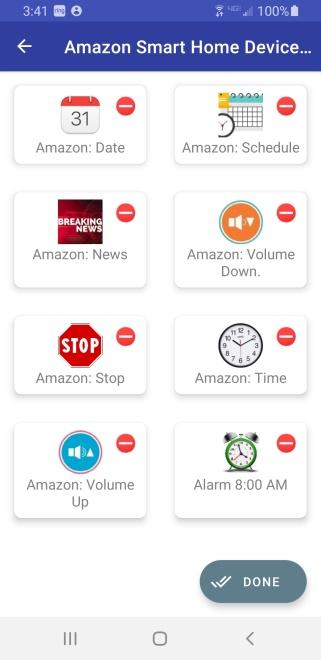
5.4.4 Delete Button Menu Selection
When selected from the menu, the app changes from the action mode to delete mode. All buttons, except the default buttons, are shown with a small red icon indicating the buttons are available for deletion. There is a “Done” button on the bottom right to go back from the delete mode when you delete the selected button.
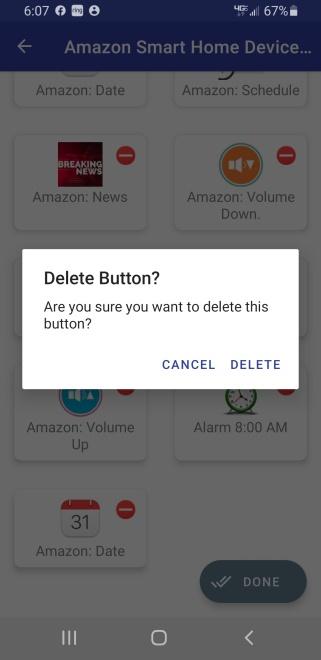
Deleting the button
When you select a button to delete, you are presented with a confirmation dialog to confirm the deletion. If you press the delete option, then button is deleted from your device. Lastly, press the Delete button.
5.4.5 Edit Button Menu Selection
When selected from the menu, the app changes from the action to mode to the edit mode:
All the buttons except default buttons are shown with a green dot indicating the buttons are available for editing the buttons content and behavior.
There is a “Done” button on the bottom right to go back from the share mode to action mode after you edit the selected button. Lastly, press the Save button.
Editing a button
When you select a button to edit, you presented with the screen with the possibility to share any of the following attributes of the button:
- Button Name
- Select Button Type
- Select Icon
- Enter Text
For each button action type, please see “Add a New button” section for available options for each button type. After modifying the desired attributes of the button, press the “Save” button to keep the changes.

5.4.6 Share Button Menu Selection
When selected from the menu, the app changes from the action to mode to the share mode:
All the buttons except default and Category buttons can be shared. Tap the “Done” button to go back to where you were.

Sharing a button:
Press any of the buttons tagged with the shared icon to share content with the other users. When a button is selected, the target button is shared along with the following content:
- Button Code: Code for the button
- Button Name: Name for the button
- QR Code: To scan
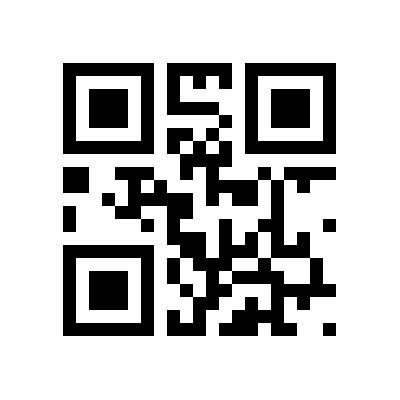
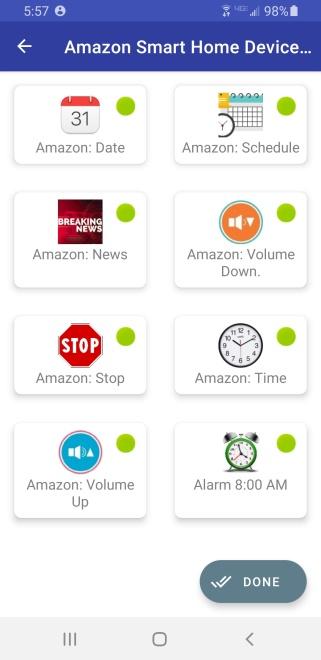
Here are a few examples to experiment with. First, create two Category Buttons as follows:
- Amazon Smart Home Device Commands
- Google Assistant Commands
Next, click on Amazon Smart Home Device Commands. From within that blank category, add the two following buttons either by entering the code number or using the accompanying QR Code:
Button Name: Amazon: Date
Button Code: 38suyo9gx
Button Name: Amazon: News
Button Code: 3wpv4rjzf
Next, click on Google Assistant Commands. From within that blank category, add the two following buttons either by entering the code number or using the accompanying QR Code:
Button Name: Google: Time
Button Code: 41bgxnmc7
Button Name: Google: Date
Button Code: 2v6thgm6i
5.4.7 Documentation Menu Selection
This selection will display SHH’s User Documentation
5.4.8 Feedback Menu Selection
When selecting the feedback button, user’s default email client is launched with the values of recipient set to the developer and subject set to “Smart Home Helper Feedback.” Document your feedback and send the email. It will be sent to the developer in support of further improving SHH.
6.0 Smart Home Helper Android Application Languages
To activate Google Text-to-speech for use by Smart Home Helper, go to Settings > Language & Input > Text-to-speech output. Select Google Text-to-speech Engine as your preferred engine. Note: on many Android devices, Google Text-to-speech is already turned on.
Here is a list of the text-to-speech languages available (as of Android 10). Note: Android provides the ability to adjust the “Speech Rate” and “Pitch” of each of these languages.
- Albanian
- Arabic
- Bangla (Bangladesh)
- Bangla (India)
- Bosnian
- Cantonese (Hong Kong)
- Catalan
- Croatian
- Czech (Czechia)
- Danish (Denmark)
- Dutch (Netherlands)
- English (Australia)
- English (India)
- English (Nigeria)
- English (United Kingdom)
- English (United States)
- Estonian (Estonia)
- Filipino (Philippines)
- Finnish (Finland)
- French (Canada)
- French (France)
- German (Germany)
- Greek (Greece)
- Gujarati (India)
- Hindi (India)
- Hungarian (Hungary)
- Indonesian (Indonesia)
- Italian (Italy)
- Japanese (Japan)
- Javanese (Indonesia)
- Kannada (India)
- Khmer (Cambodia)
- Korean (South Korea)
- Kurdish
- Latin
- Malayalam (India)
- Marathi (India)
- Mandarin (China)
- Mandarin (Taiwan)
- Marathi (India)
- Nepali (Nepal)
- Norwegian (Norway)
- Polish (Poland)
- Portuguese (Brazil)
- Portuguese (Portugal)
- Romanian (Romania)
- Russian (Russia)
- Serbian
- Sinhala (Sri Lanka)
- Slovak (Slovakia)
- Spanish (Spain)
- Spanish (United States)
- Sudanese (Indonesia)
- Swahili
- Swedish (Sweden)
- Tamil (India)
- Telugu (India)
- Thai (Thailand)
- Turkish (Turkey)
- Ukrainian (Ukraine)
- Urdu (Pakistan)
- Vietnamese (Vietnam)
- Welsh